Part 1. How to use BackgroundTask in SwiftUI to build a local notification scheduler with customisable patterns.
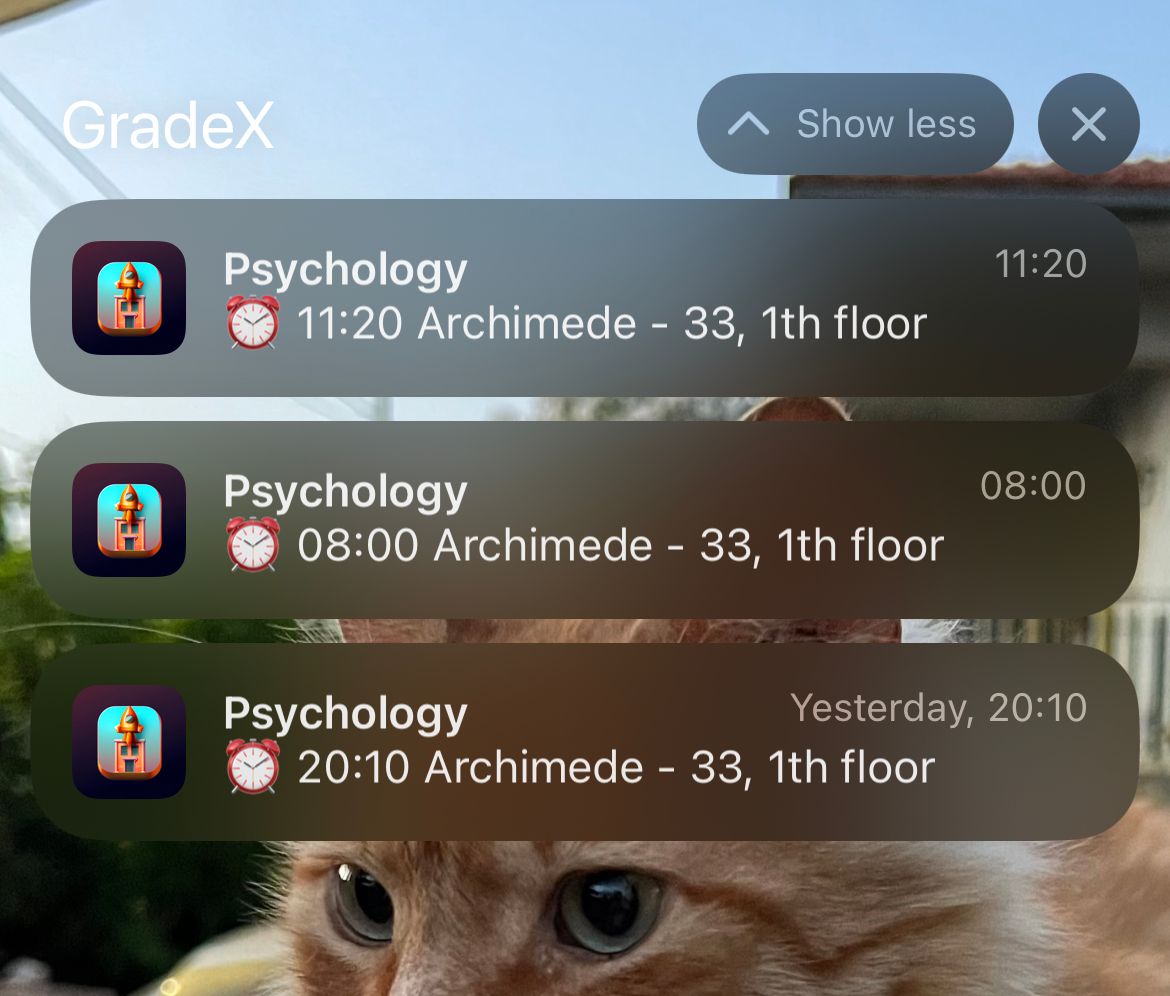
An essential aspect of any app designed to manage custom calendar events, timetables, or tasks is its ability to schedule reminders.
Typically, reminders are delivered as local or remote notifications. However, both options have significant trade-offs when implementing custom recurrence rules, such as repeating the notification every three days.
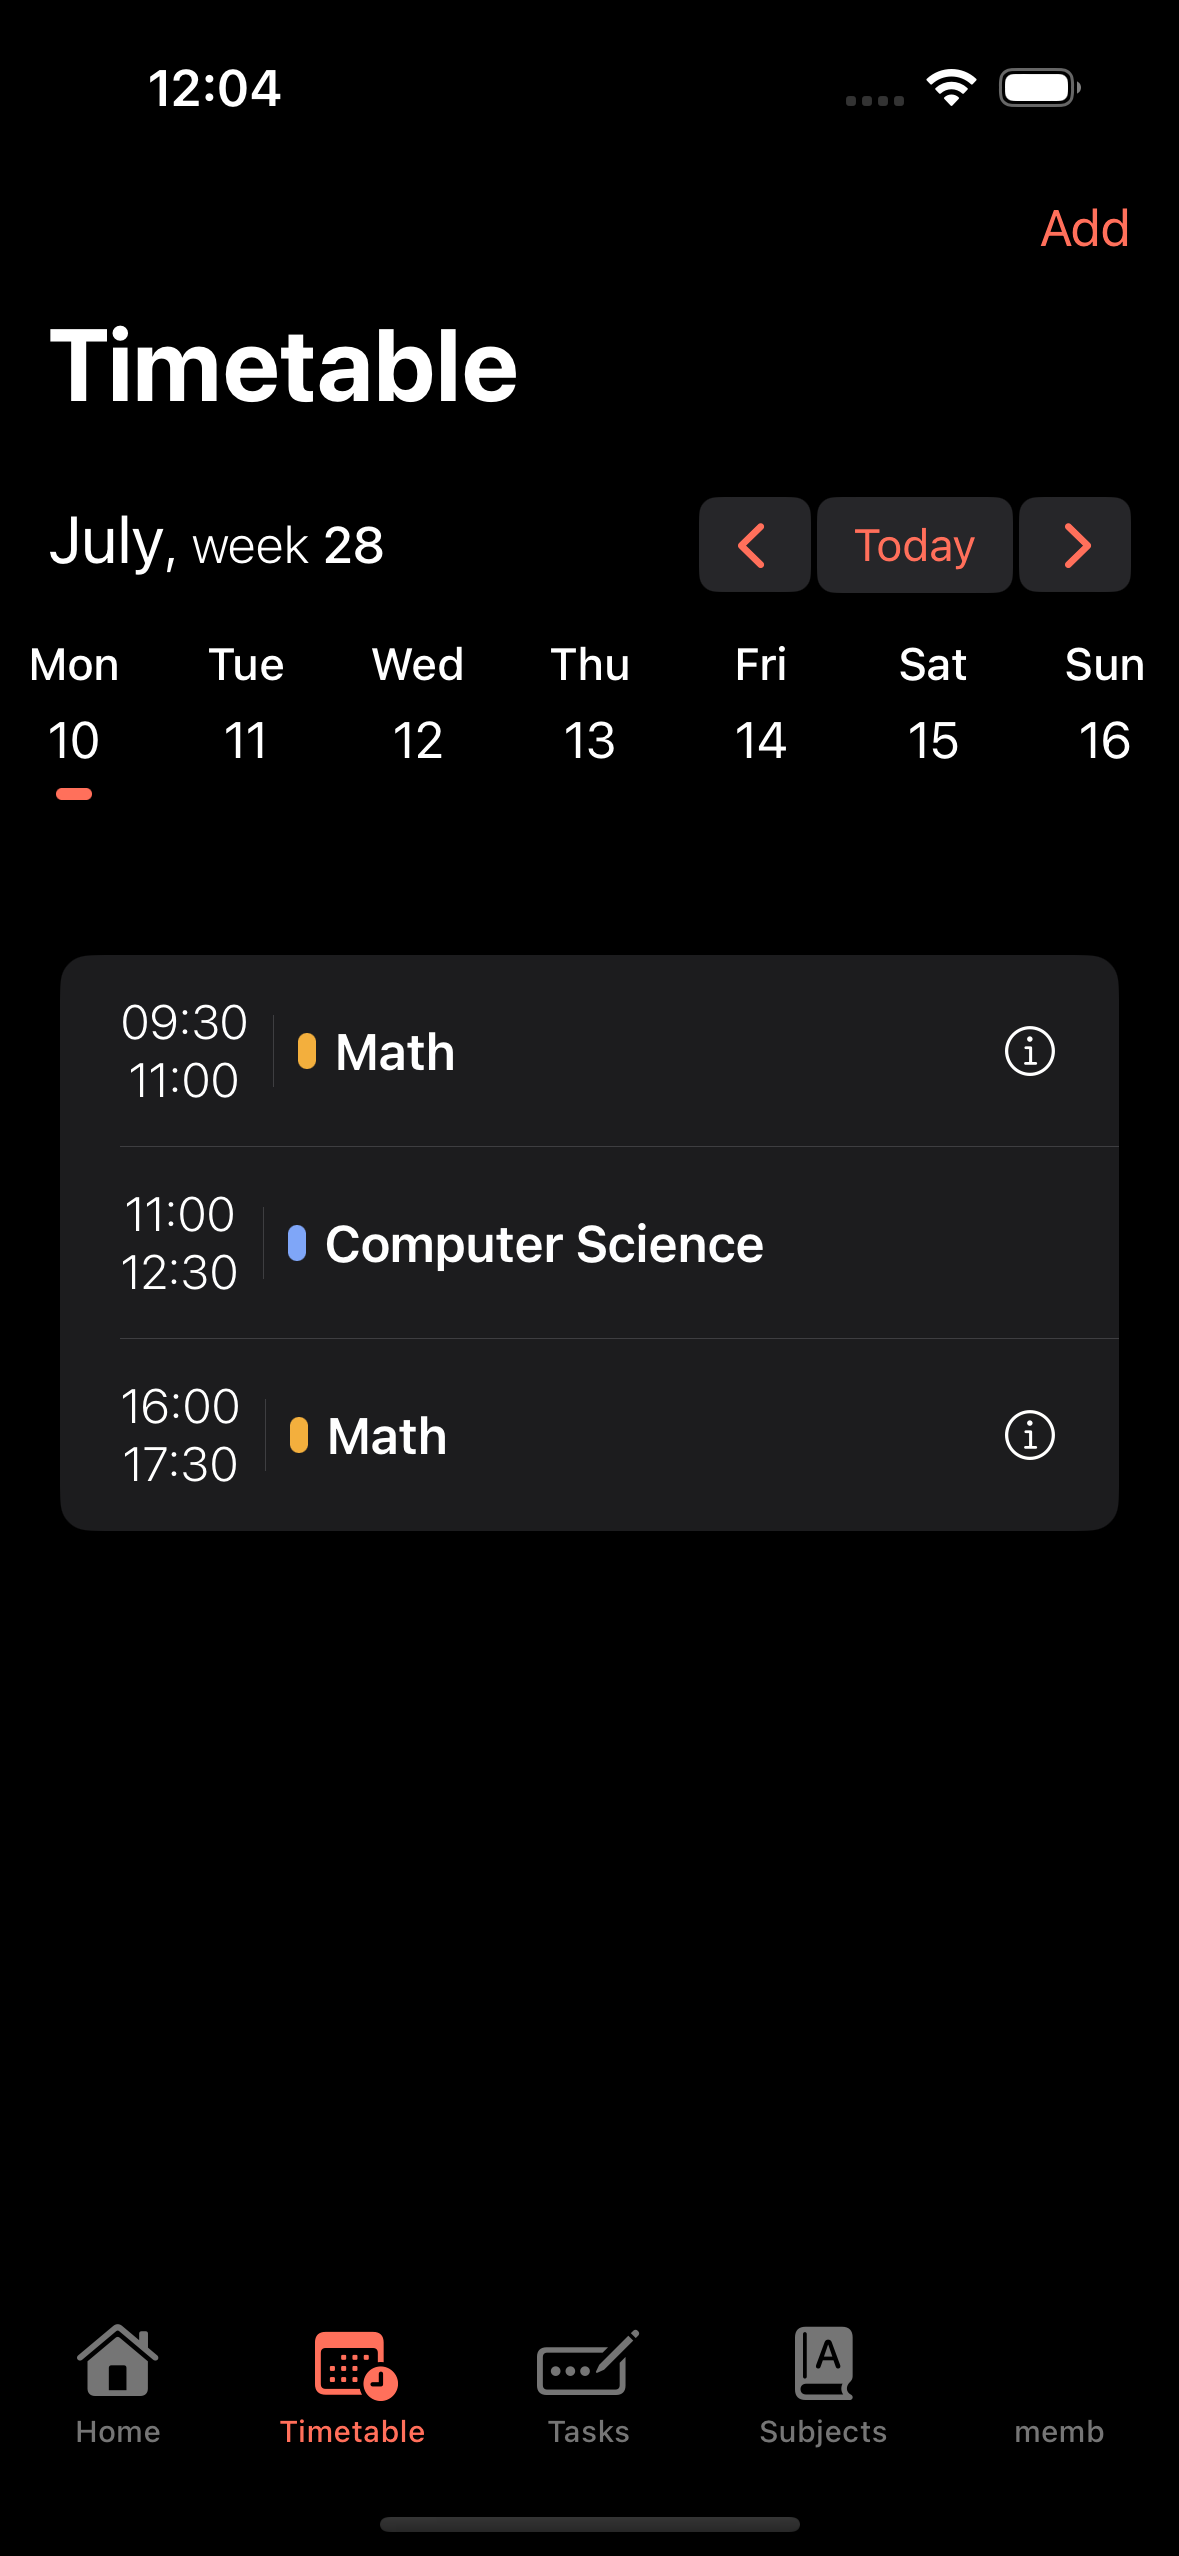
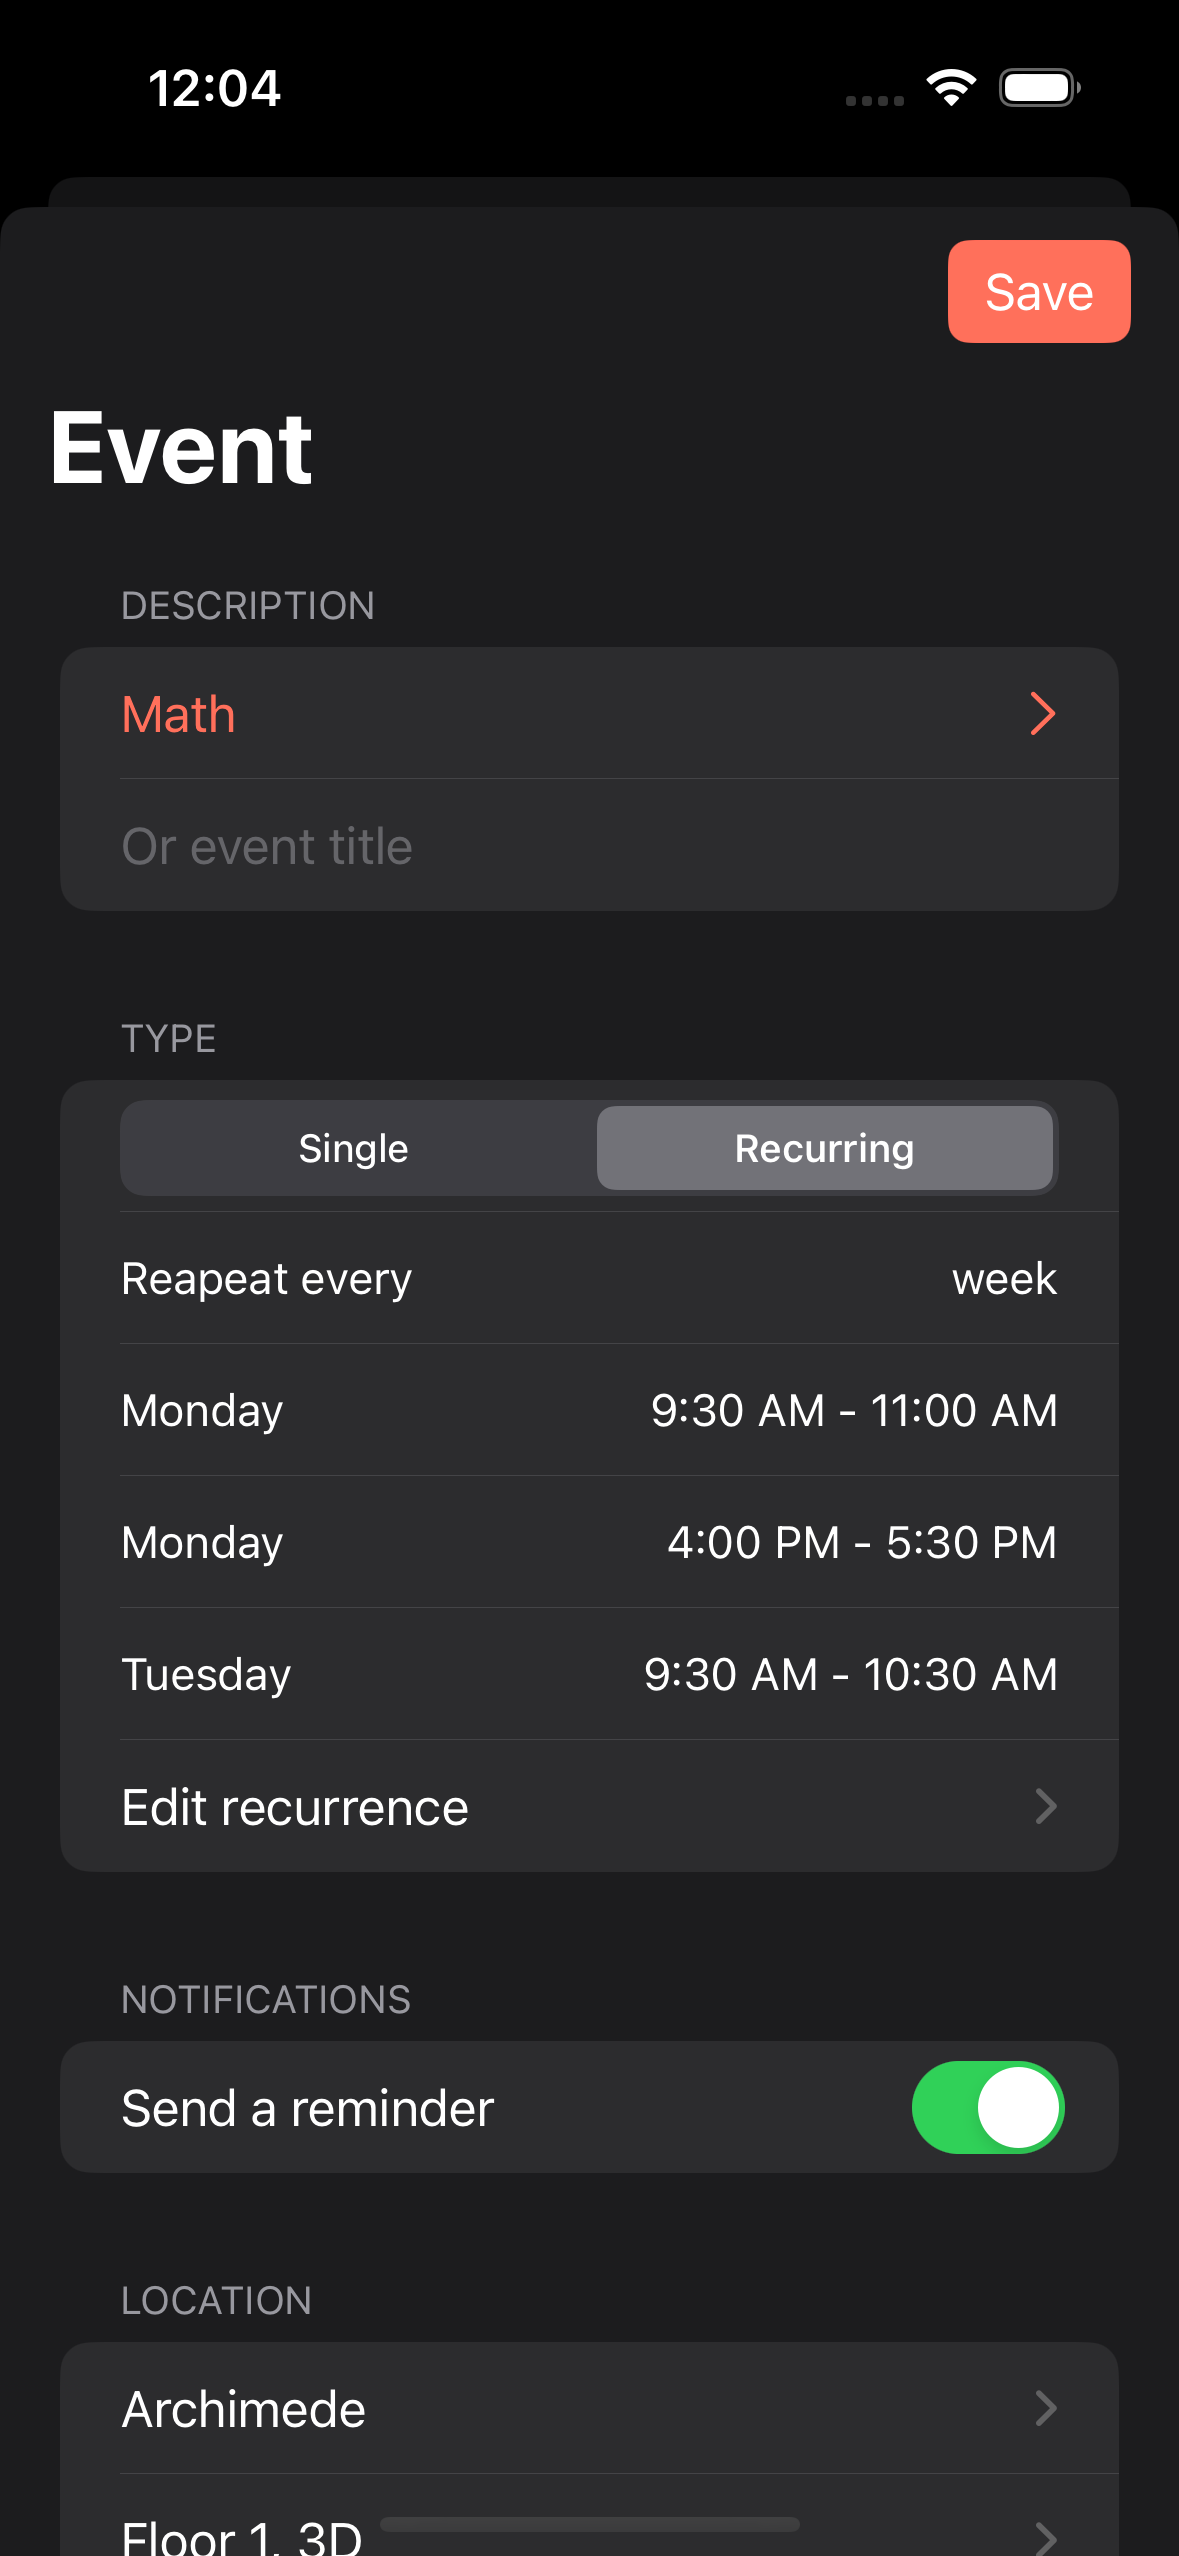
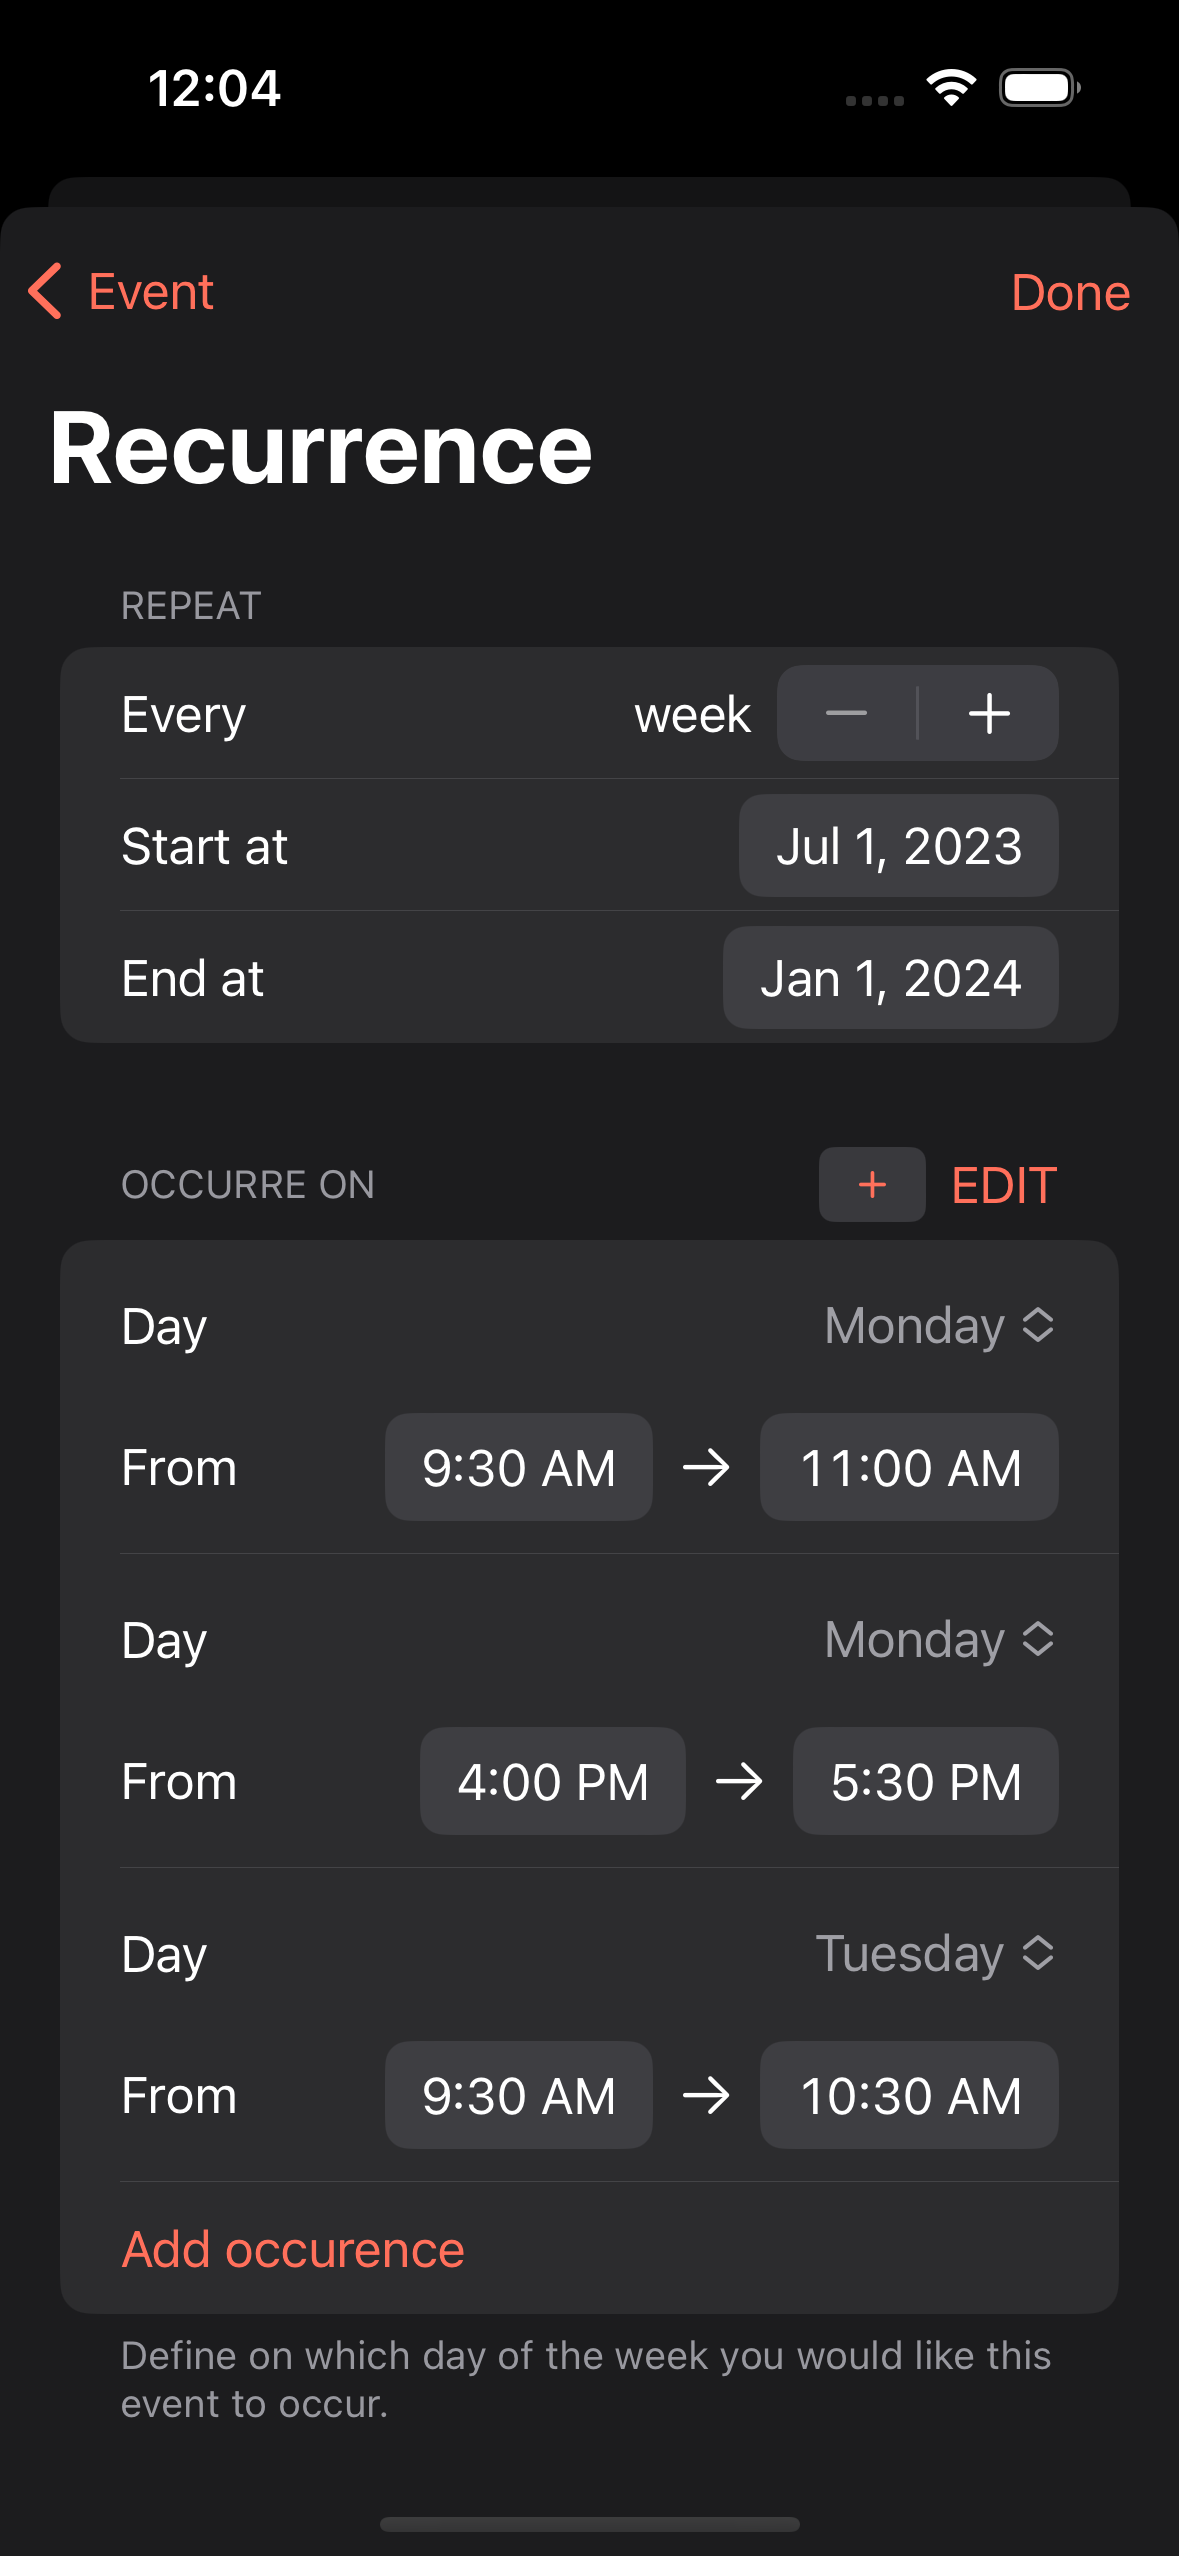
GradeX: an app that allows users to define timetables and recurring events.
Remote strategies usually rely on cron jobs, which calculate and dispatch the upcoming batch of notifications at preset intervals (e.g. every 5 minutes).
Yet, using a cron job to handle recurring events requires managing a lot of complexity. We will not go through all of the pitfalls, but two are probably the most important:
- Time sensitiveness: The longer the cron interval, the higher the chance that notifications are not dispatched at the expected time. The shorter the interval, the higher the chance of increasing system cost.
- N+1 query: The user data associated with the notification must be stored in a way that is fast and easy to access. Otherwise, you might incur the n+1 query problem whenever you need to fetch cascade data (e.g. fetch notification content -> fetch user info -> fetch event location).
Also, what if you can't spin up a backend service to manage remote notifications? Or what if you want to start simple and move to a more complex notification scheduler later?
An alternative for BullMQ is Agenda; they share the same core functionalities.
If you don't need advanced cron functionality, you can look at Firebase schedule functions,
Here is where local strategies play a vital role.
In Swift, we can schedule repeating notifications through the UNUserNotificationCenter object.
When defining a UNNotificationRequest we can set a UNCalendarNotificationTrigger that accepts a DateComponents to describe a basic recurring rule:
let repeatEveryMondayAtNine = DateComponents(
   	hour: 9,
    minute: 0,
    weekday: 1
)

let content = UNMutableNotificationContent()
content.title = "Hello world!"
content.body = "every monday"

let trigger = UNCalendarNotificationTrigger(
    dateMatching: repeatEveryMondayAtNine,
    repeats: true // makes it recurrent
)

let request = UNNotificationRequest(
    identifier: UUID().uuidString,
    content: content,
    trigger: trigger
)

try await UNUserNotificationCenter.current().add(request)
While using a DateComponents can solve most basic use cases, it falls short when used to handle more complex recurring scenarios such as:
- Defining the recurring notification
startAtandendAttriggers. E.g. the user wants the recurring event to start in 5-day days and finish in a month. - Defining recurrences that are dependent on a
startDate. E.g. repeating every three days requires knowing when to start counting the occurrences.
On top of these two scenarios, there is a limit on the number of notifications that you can schedule using UNUserNotificationCenter:
An app can have only a limited number of scheduled notifications; the system keeps the soonest-firing 64 notifications (with automatically rescheduled notifications counting as a single notification) and discards the rest.
https://developer.apple.com/documentation/uikit/uilocalnotification
Does this mean we are stuck in this limbo where the notification centre is the only local technology we can use?
Kind of, but we can circumnavigate these restrictions using background modes.
A background mode allows a task defined in our codebase to run asynchronously when our app is suspended.
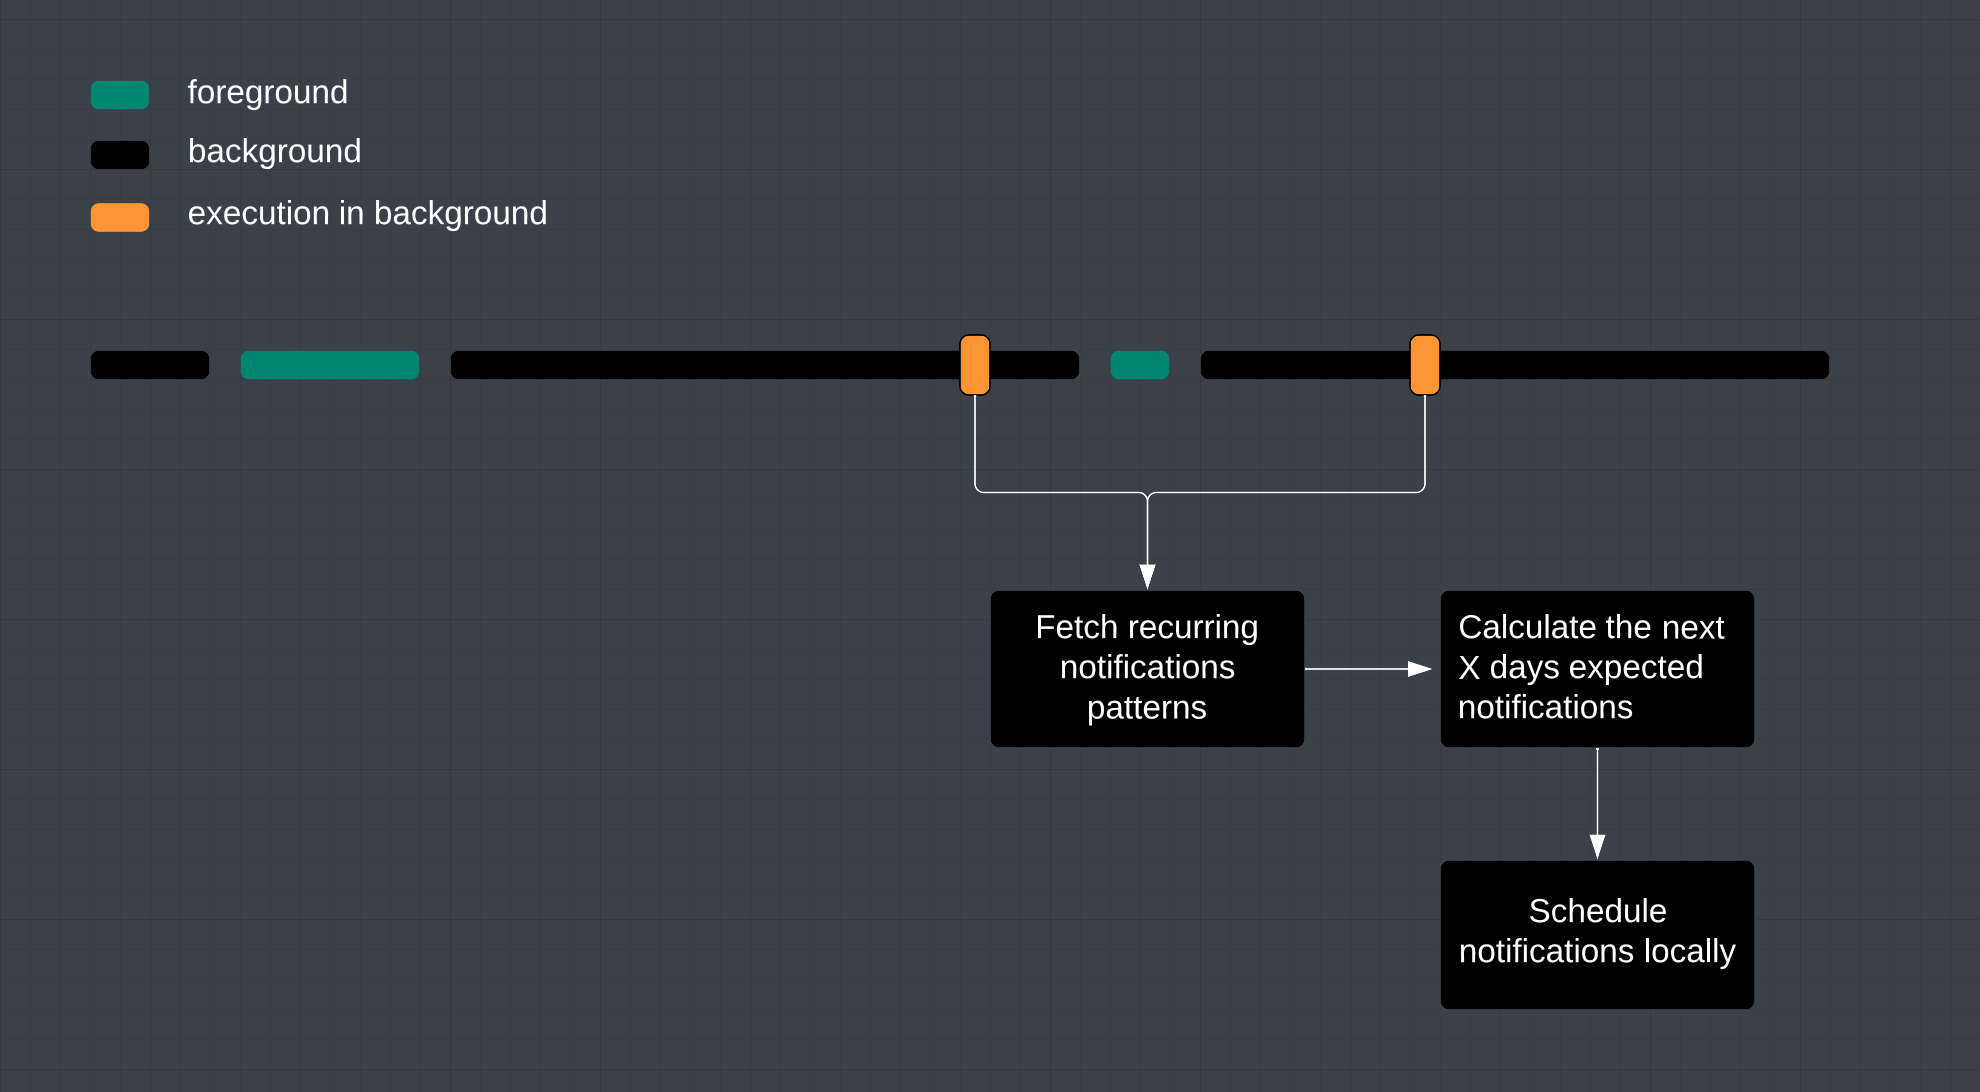
Thanks to the Background Fetch mode, whenever our app is in the background, iOS will give us a chance to run a short-lived async function called BackgroundAppRefreshTask that we can employ as a native cron job:
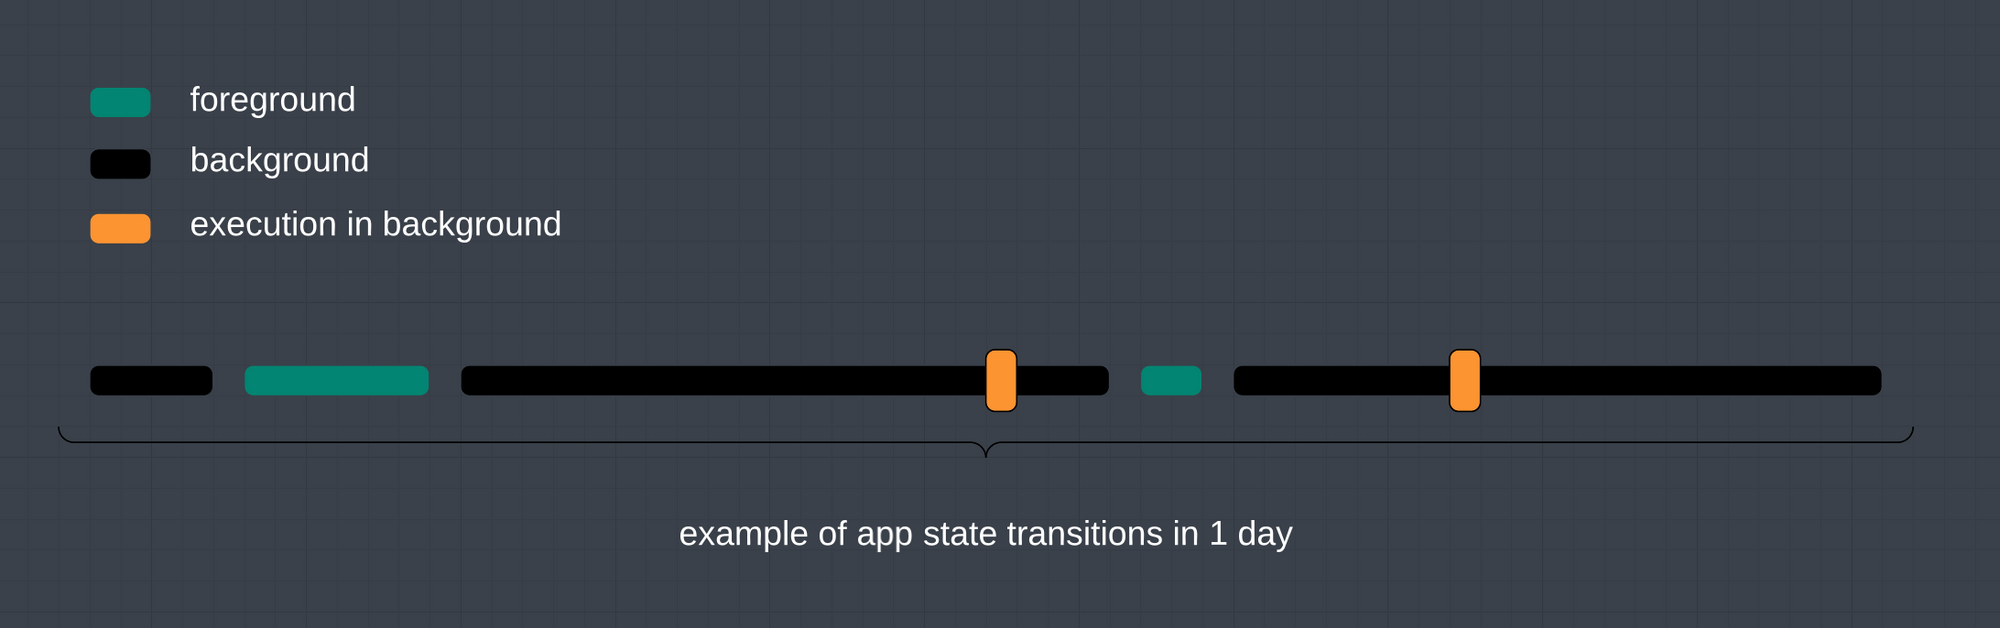
BackgroundAppRefreshTask when the app is in the background.For our use case, each time our BackgroundAppRefreshTask is invoked, we can calculate the upcoming notifications and schedule them using the UNUserNotificationCenter:
So without further ado, If you want to improve your app notifications capabilities and need custom recurring rules, today we will look at implementing a local notification scheduler using BackroundTask in SwiftUI.
Ready? Let's start!
Add a background task in SwiftUI
First, we must inform iOS that our app can be awakened while running in the background.
Navigate to the Signin and Capabilities tab, click on the + Capability and search Background Modes:
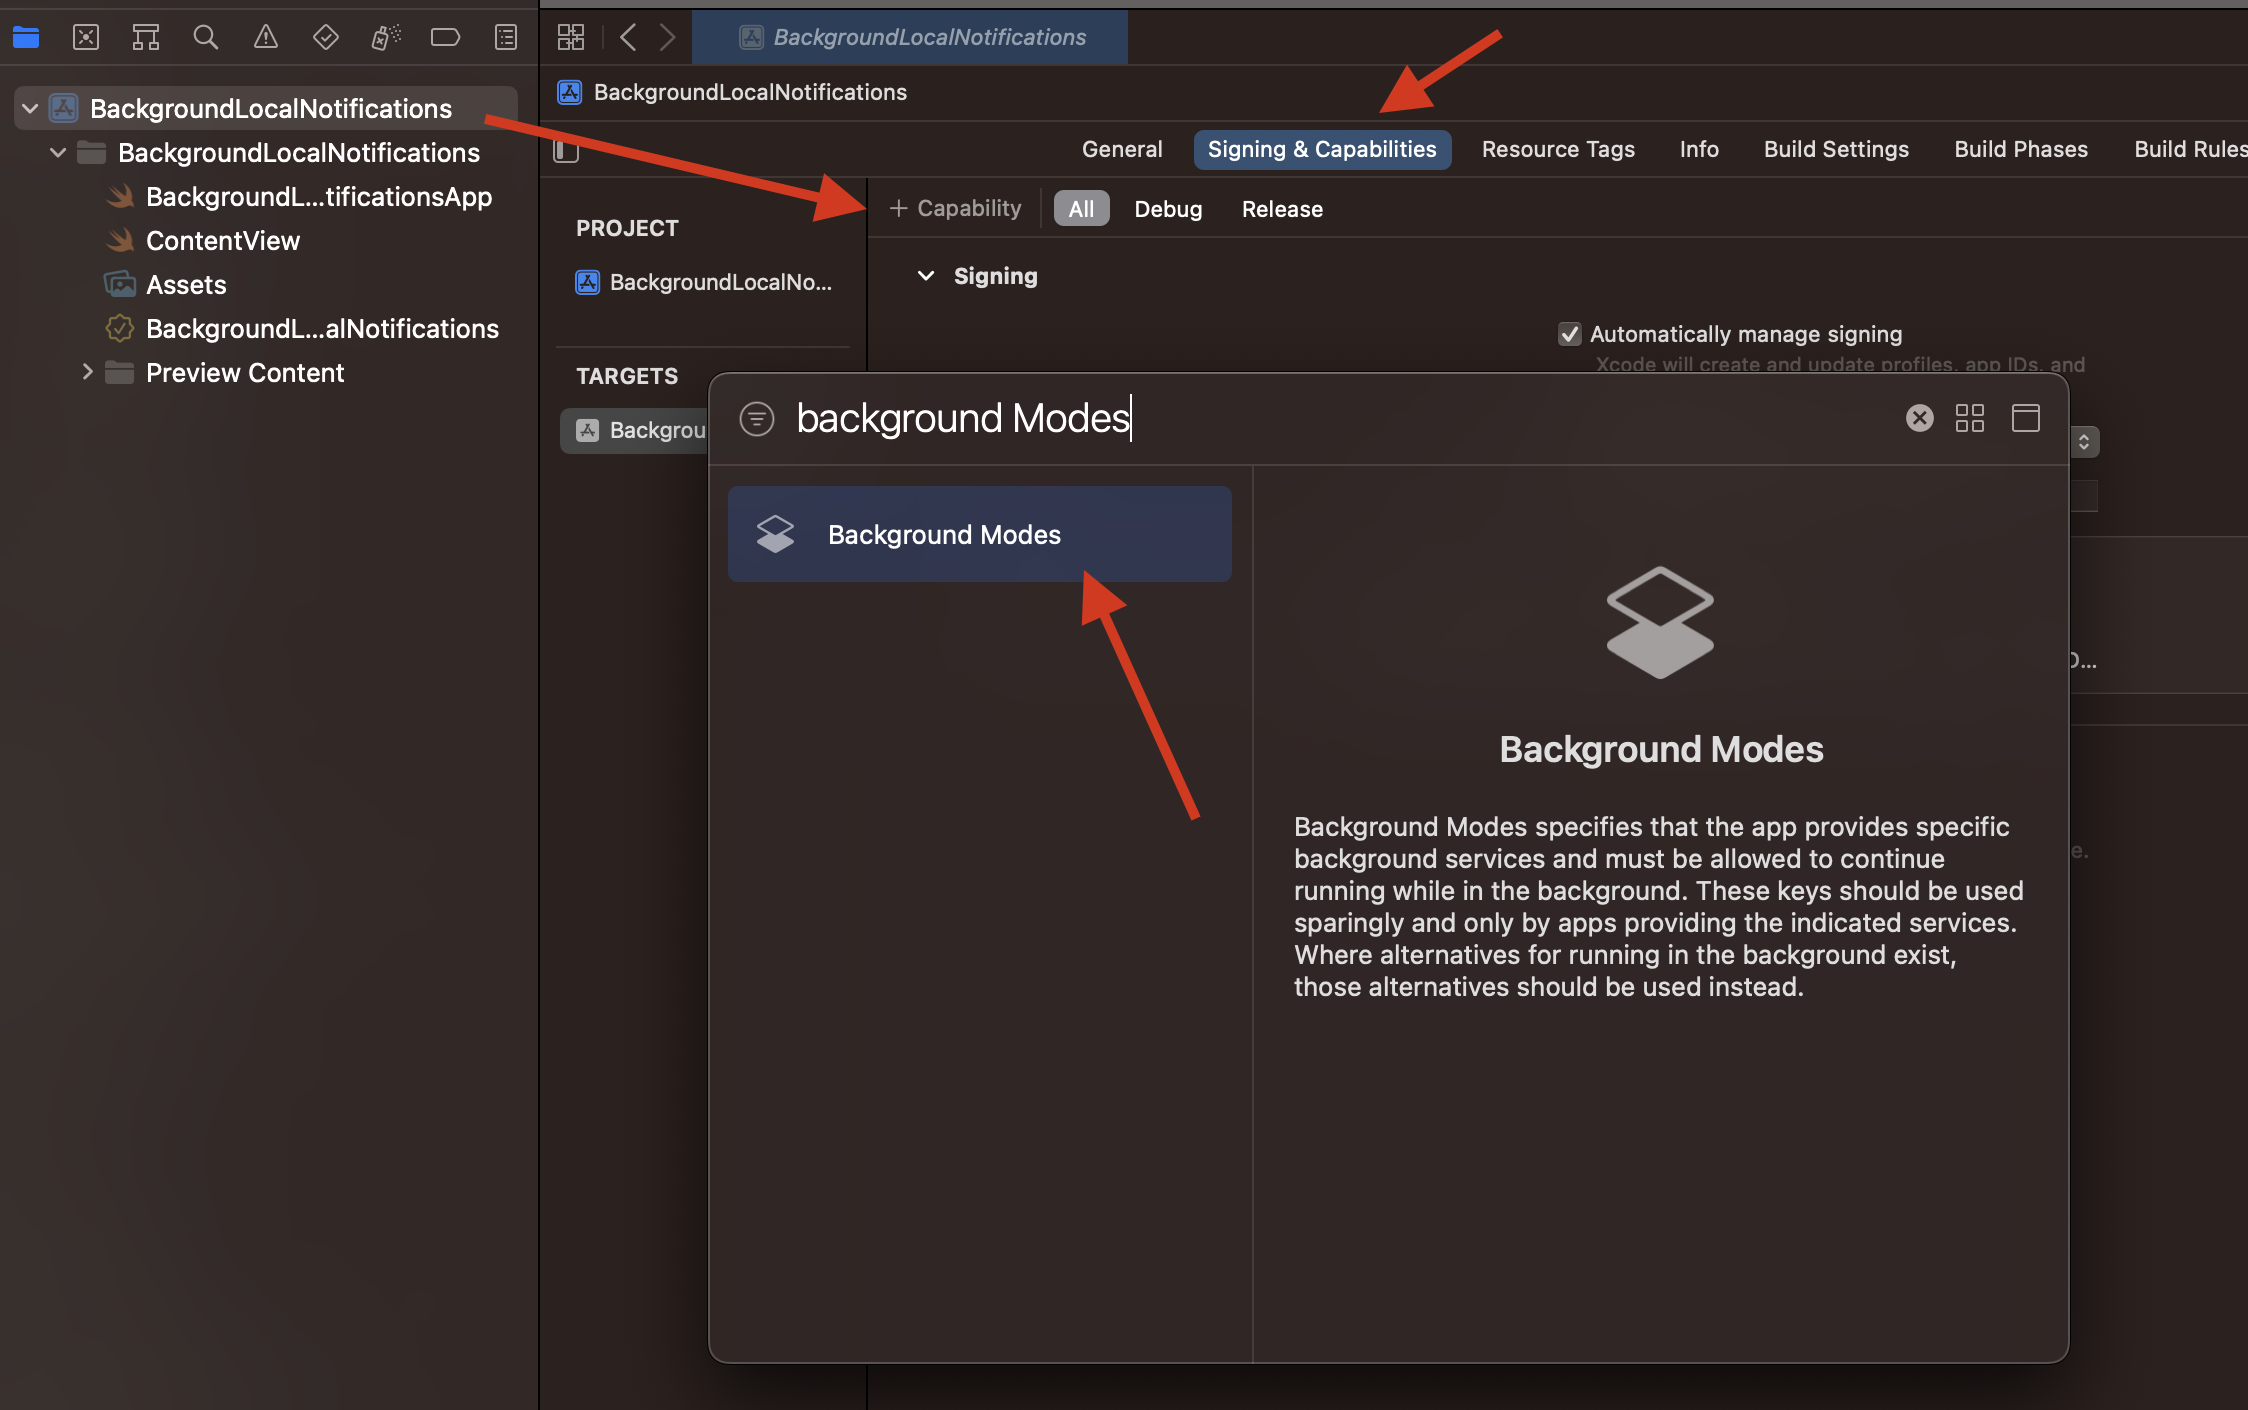
Next, select Background fetch as our background mode:

Background fetch vs Background processing
If this is your first time using a background mode, you must remember that there are two crucial types of background tasks:
BGAppRefreshTask: Short-lived tasks, 30 secs max. Enabled through Background fetch.BGProcessingTask: Time-consuming tasks such as uploading large files during idle time. Those are allowed through Background processing.
Wouldn't it be better to use BGProcessingTask in our case?
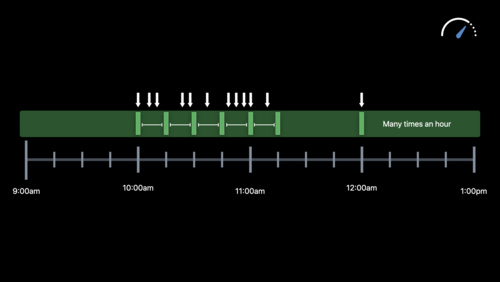
The background processing tasks can run only in idle state, meaning the system recognises that the user has not used the phone for a prolonged time (they might run at night or not run at all; it depends on the user's behaviour).
Plus, background processing tasks are immediately interrupted if the user interacts with the phone.
On the other side, background app refreshing tasks are not affected by idle state ; therefore, you have a better chance to run them multiple times a day if needed.
Because we will not go too deep into the details of background tasks, I highly recommend watching the Background execution demystified WWDC20 session:
Defining the background task
Now that our app is ready to use background mode, it is time to define our first task. There are two essential details to remember:
- Each background task must have a unique identifier and be exposed through the
info.plist.
The identifier is used to awaken your app from the background. - Your
Sceneneeds to expose the same background task identifier by using thebackgroundTaskmodifier.
Let's start with step 1.
Go into your Info.plist file and add the key called Permitted background task scheduler identifiers or BGTaskSchedulerPermittedIdentifiers. It should be an Array of String.
Then add your task name; use a reverse domain notation if possible. For this tutorial, I will use com.myapp.notifications.scheduler:
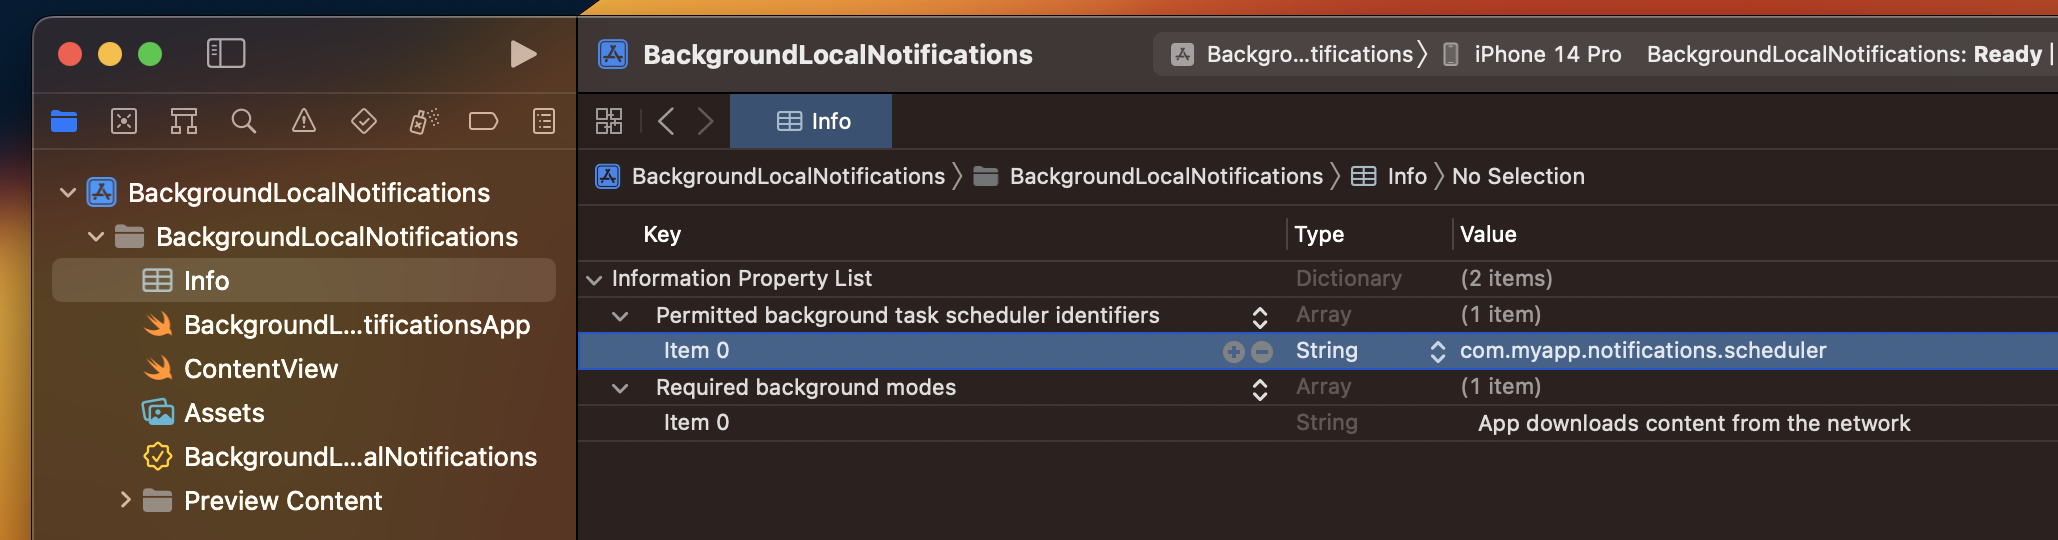
Info.plist should look like after enabling the background modes and adding the BGTaskSchedulerPermittedIdentifiers.Now, let's head into your Scene SwiftUI file. In your WindowGroup add the backgroundTask modifier.
This modifier has two arguments:
backgroundTask(
	_ task: BackgroundTask<Request, Response>,
    action: (Sendable) async -> Sendable
)task: TheBackgroundTask<Request, Response>that our app will run.action: An async function to perform whenever the task is awakened.
To define the task you can use the factory method appRefresh .
app refresh allows you to link the BGAppRefreshTask, through its identifier, with the actionto perform:
WindowGroup {
    ContentView()
}
.backgroundTask(.appRefresh("com.myapp.notifications.scheduler")) {
    // 2
}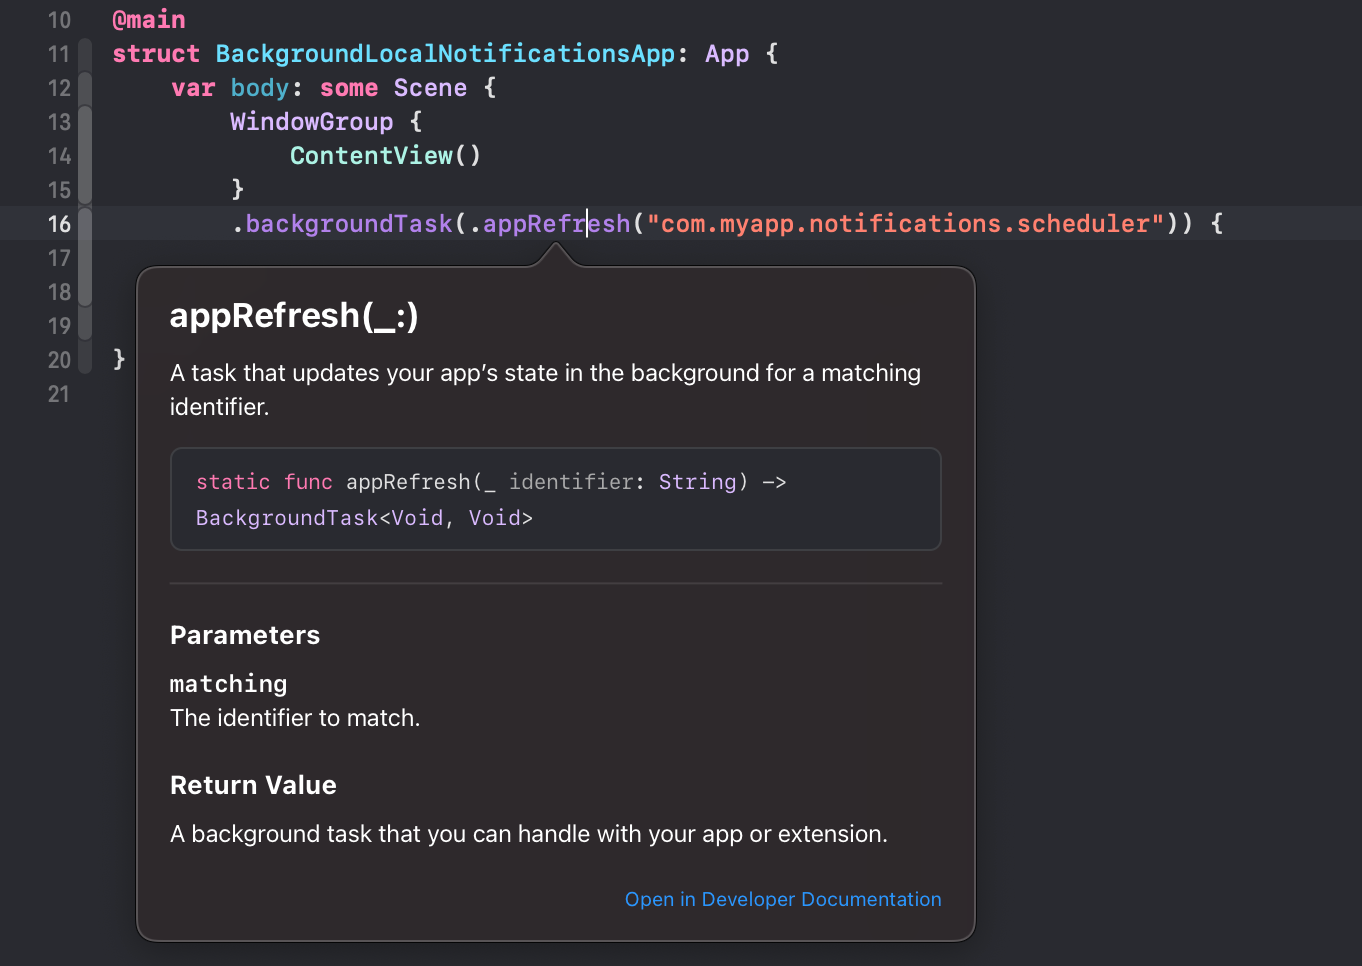
Scene backgroundTask modifiers allow you to define an action to perform while the app is in the background.Now that we have defined our background mode, we have exposed the identifier to the OS and prepared the scene to handle the task; let's have a look at how to schedule our appRefresh.
How to schedule a backgroundTask in SwiftUI
Hypothetically, to avoid running into the hard cap of 64 local notifications, we could set our background task to run every one/two days.
To schedule a background task, the first thing to do is construct a BGAppRefreshTaskRequest. As the name suggests, it allows us to define the appRefresh task to be launched.
Once we have initialised the request, we can submit it to the BGTaskScheduler that will pass the request to the system.
import BackgroundTasks

let request = BGAppRefreshTaskRequest(
	identifier: "com.myapp.notifications.scheduler" // 1
)

// TODO: schedule task at a predefined date

do {
	try BGTaskScheduler.shared.submit(request) // 2
} catch let error {
	print("[BGTaskScheduler] error:", error)
}- The
BGAppRefreshTaskRequestis initialised with theidentifierof the task to be run. - The
submitmethod will queue your request and replace any previously submitted request with the same identifier. Remember that there can only be oneappRefreshrequest with the same identifier at any given time.
Now, let's hook this logic into our SwiftUI Scene.
The best moment to tell the BGTaskScheduler to queue our task is when the app is about to go in the background. To do so, we need to listen for ScenePhase changes using the onChange modifier against our WindowGroup:
import SwiftUI
import BackgroundTasks

@main
struct BackgroundLocalNotificationsApp: App {

    private static let appRefreshIdentifier = "com.myapp.notifications.scheduler"

    @Environment(\.scenePhase) private var scenePhase // 1

    var body: some Scene {
        WindowGroup {
            ContentView()
        }
        // 2
        .onChange(of: scenePhase, perform: { newValue in
            switch newValue {
            case .active: break
            case .inactive: break
            case .background:
                scheduleAppRefreshTask() // 3

            @unknown default: break
            }
        })
        .backgroundTask(.appRefresh(Self.appRefreshIdentifier)) {
            // TODO: do something when the task is invoked
            print("[backgroundTask]", Self.appRefreshIdentifier, "invoked")
        }
    }

    private func scheduleAppRefreshTask() {
        let request = BGAppRefreshTaskRequest(
            identifier: Self.appRefreshIdentifier
        )

        // TODO: schedule task at a predefined date

        do {
            try BGTaskScheduler.shared.submit(request)
            print("[BGTaskScheduler] submitted task with id: \(request.identifier)")
        } catch let error {
            print("[BGTaskScheduler] error:", error)
        }
    }
}
Snippet: how to schedule a BGAppRefreshTaskRequest when our app transitions to the background in SwiftUI.
- The
Environment\.scenePhasegive us the ability to understand whether our app is inactive,inactiveorbackgroundstate. - The
onChangemodifier will notify us when thescenePhaseis changing. - When we enter the background phase, we will try to schedule our
BGAppRefreshTaskRequest.
Currently, our logic tries to enqueue the task as soon as the app enters the background. Doing so doesn't necessarily mean that the task will be run immediately; instead, we let the system decide the optimal time to run the task.
Can we define our task to run at a specific time?
Unfortunately not.
The only customisation we can put on our BGAppRefreshTaskRequest is defining the earliestBeginDate. This property will constraints the system from running the task earlier than our earliestBeginDate.
Said so, let's add at least 12 hours of delay before the task can be performed:
let request = BGAppRefreshTaskRequest(
    identifier: Self.appRefreshIdentifier
)

let startOfToday = Calendar.current.startOfDay(for: Date())
let beginAt = Calendar.current.date(byAdding: .day, value: 12, to: startOfToday)

request.earliestBeginDate = beginAt

/* ... */
How to test a backgroundTask in SwiftUI
Let's start by saying that testing backgroundTask in SwiftUI is only possible using a real device (at least, I was not able to test appRefresh using the simulator).
Secondly, once your device is connected to Xcode, to avoid waiting hours in the chance your appRefresh gets triggered by the system, you might want to trigger the background task manually.
To do so, you can run an instruction in your Xcode console that will trigger the backgroundTask handler associated to the task identifier:
e -l objc -- (void)[[BGTaskScheduler sharedScheduler] _simulateLaunchForTaskWithIdentifier:@"YOUR_TASK_IDENTIFIER"]This command must be executed immediately after a task has been submitted or when a task is already enqueued.
So, set at least two breakpoints:
- The first after the
submitcall on ourBGTaskScheduler. - The second inside the
appRefreshhandler.
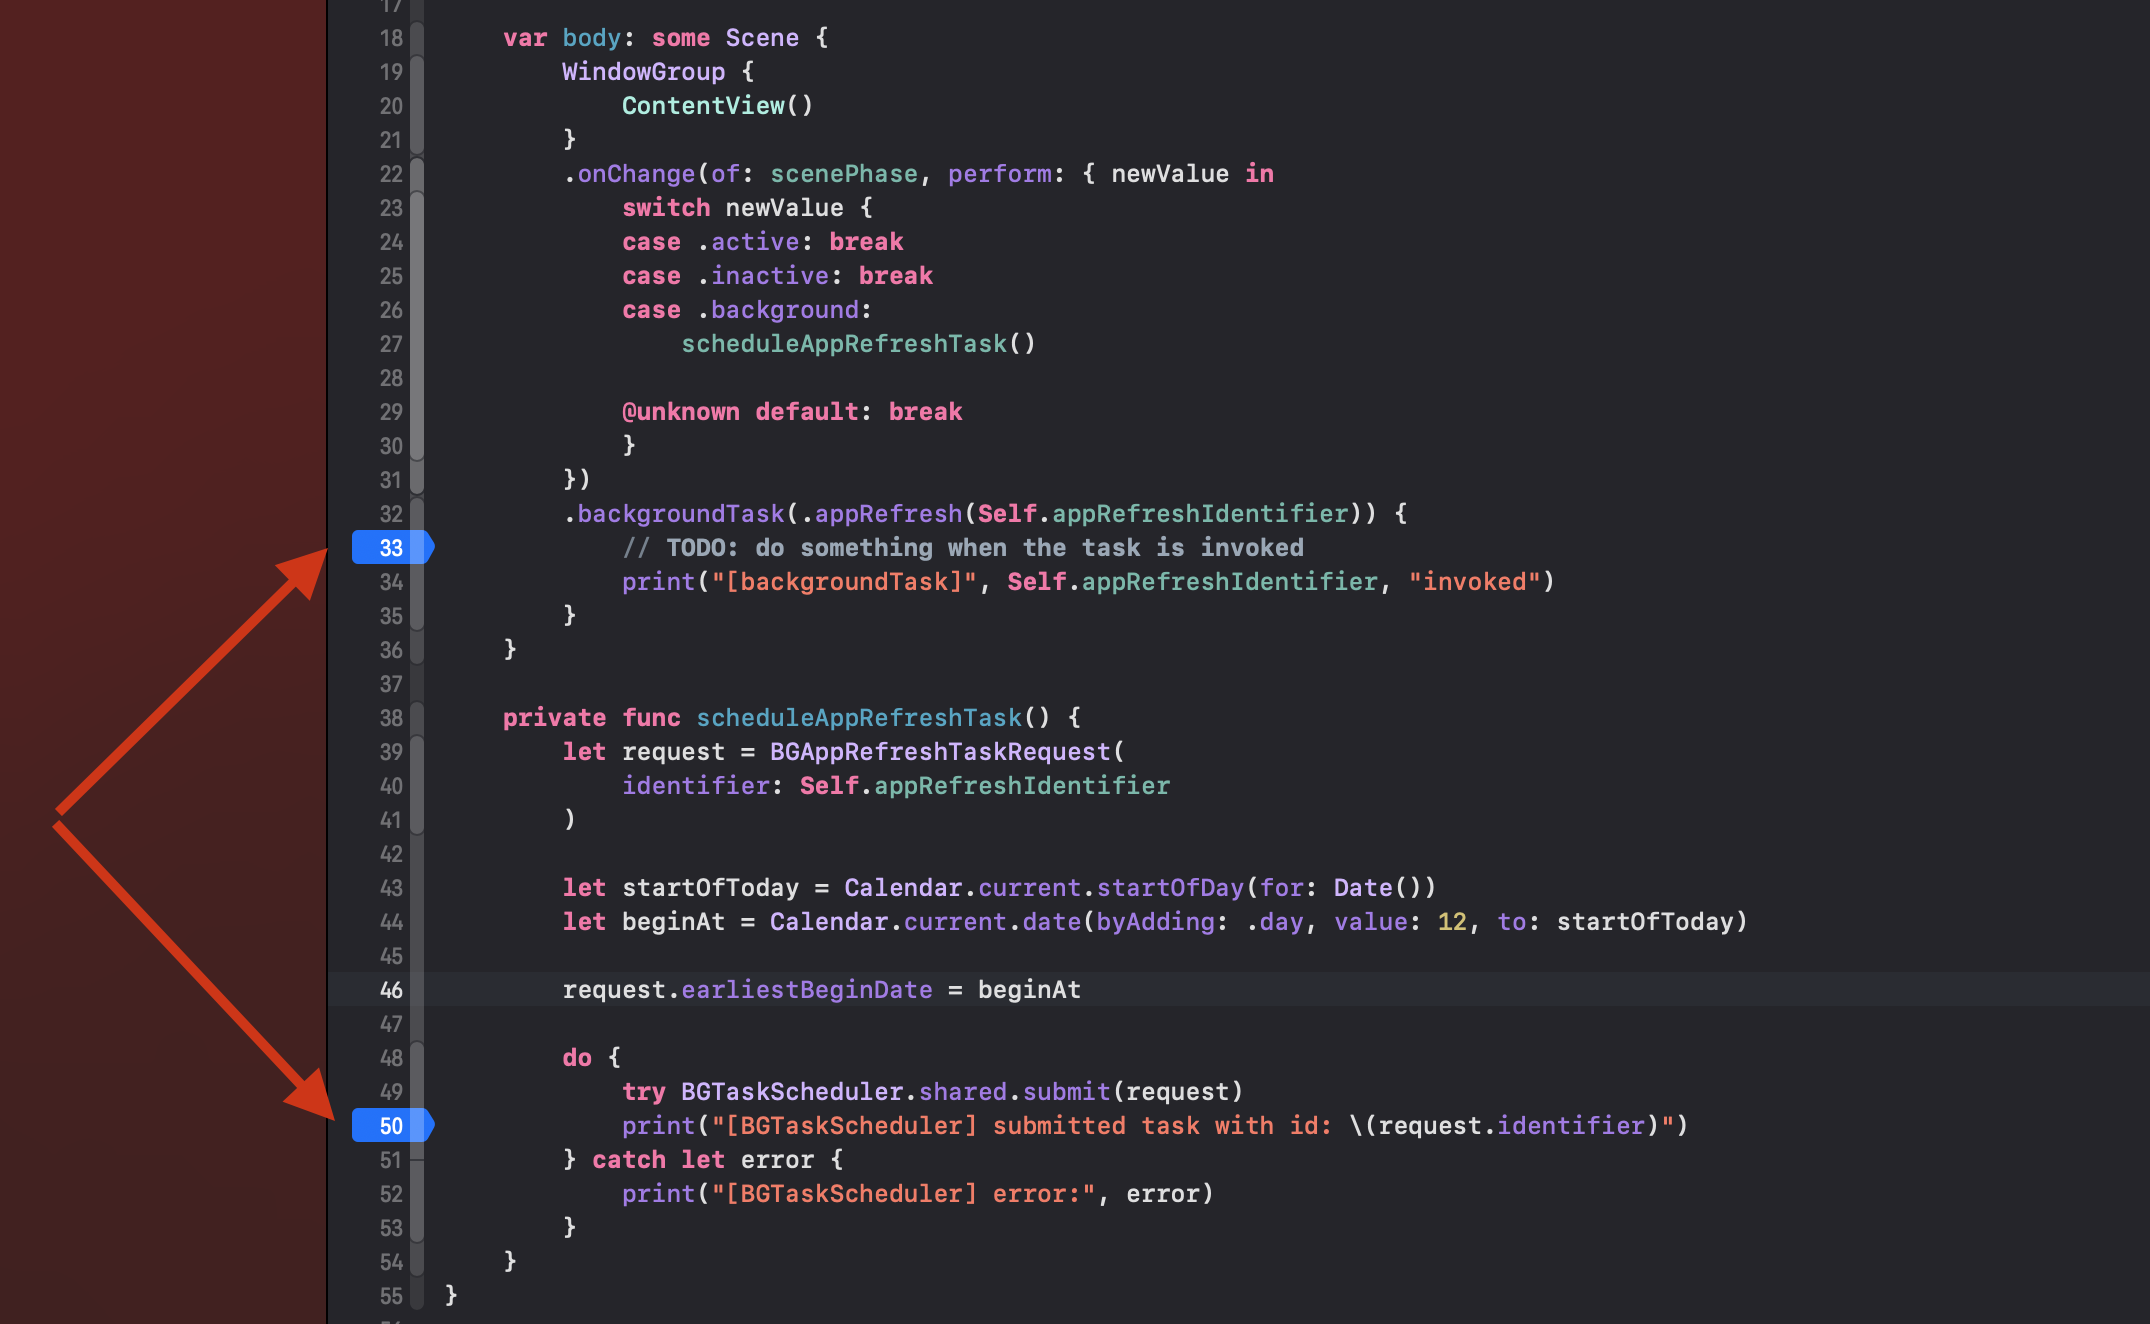
Then, launch your app on your real device, push your app in the background, wait for the task to be submitted, and finally run the command in your Xcode console. As soon you resume the app execution your backgroundTask handler will be invoked:
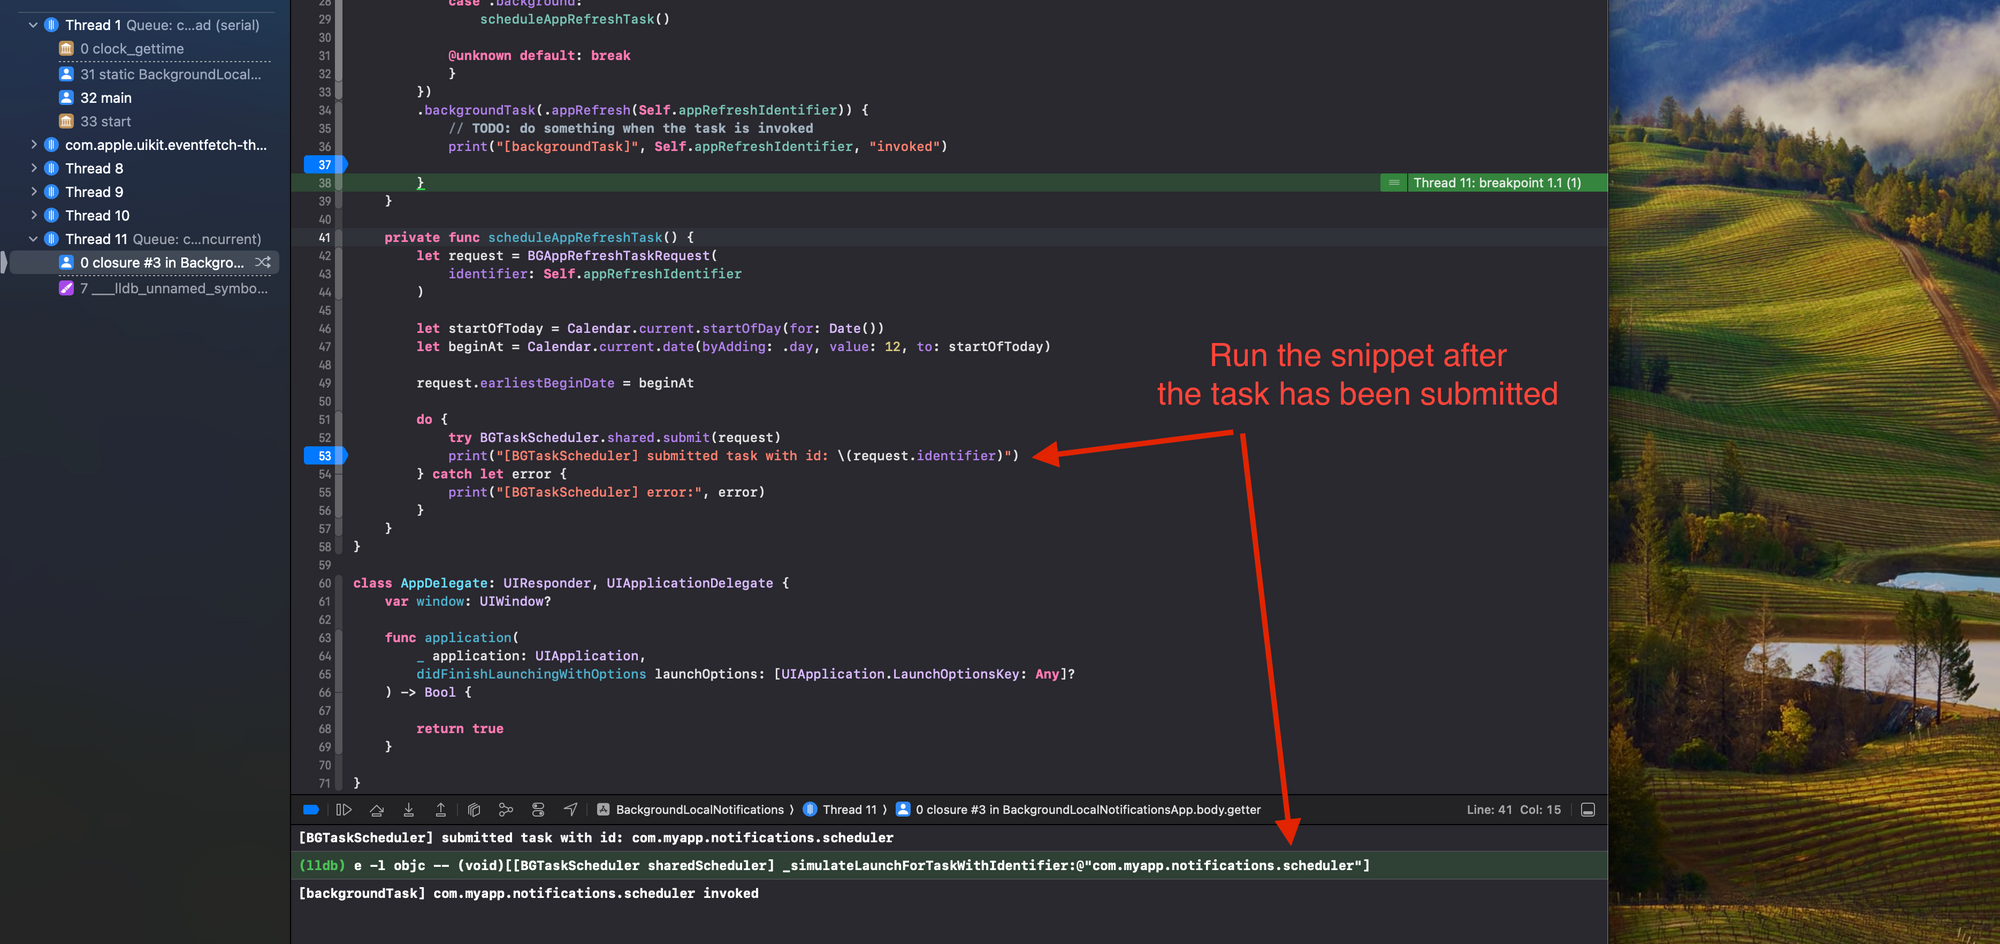
If you can reach the breakpoint inside your backgroundTask handler, it means you have successfully configured your app to use the BGAppRefreshTask.
How to check that a background task has been executed
Now that we know the system correctly handles our background task, we might want to have some tracking on when it gets invoked in our production app.
The best approach would be adding some analytics framework or, if you have a DB, a property where to store the last invocation date.
Considering we are building everything locally, we can introduce an AppStorage key that will hold the date of the last execution.
@AppStorage("lastAppRefreshExecution")
private var lastAppRefreshExecution: TimeInterval = 0
Then let's rework a bit our backgroundTask handler by moving all logic into a dedicated function.
.backgroundTask(.appRefresh(Self.appRefreshIdentifier)) {
   await onBackgroundAppRefresh()
 }


private func onBackgroundAppRefresh() async {
    print("[backgroundTask]", Self.appRefreshIdentifier, "invoked")

    // TODO: do something when the task is invoked

    // 1
    lastAppRefreshExecution = Date().timeIntervalSince1970
}- At the end of our process, we will save the time interval into
lastAppRefreshExecution. By reading this property, we will know that the background task has been successfully completed.
And lastly, we will read this property when the app comes back from the background. Meaning in our onChange of the scenePhase we will print the last execution date:
.onChange(of: scenePhase, perform: { newValue in
    switch newValue {
    case .active:
        if lastAppRefreshExecution != 0 {
            print("[backgroundTask] last execution date: \(Date(timeIntervalSince1970: lastAppRefreshExecution))")
        }
Conclusion
By using the app refresh background mode, we have set our foundation for a customisable local notification scheduler.
Of course, background mode comes with its limitations. Not knowing when precisely the appRefresh will be executed is a big drawback regarding system scalability.
But as we will see in Part 2, it is perfectly suitable for small projects that don't necessarily need advanced capabilities or throughput.
Let me know if you have any questions.
Code with joy!
Member discussion